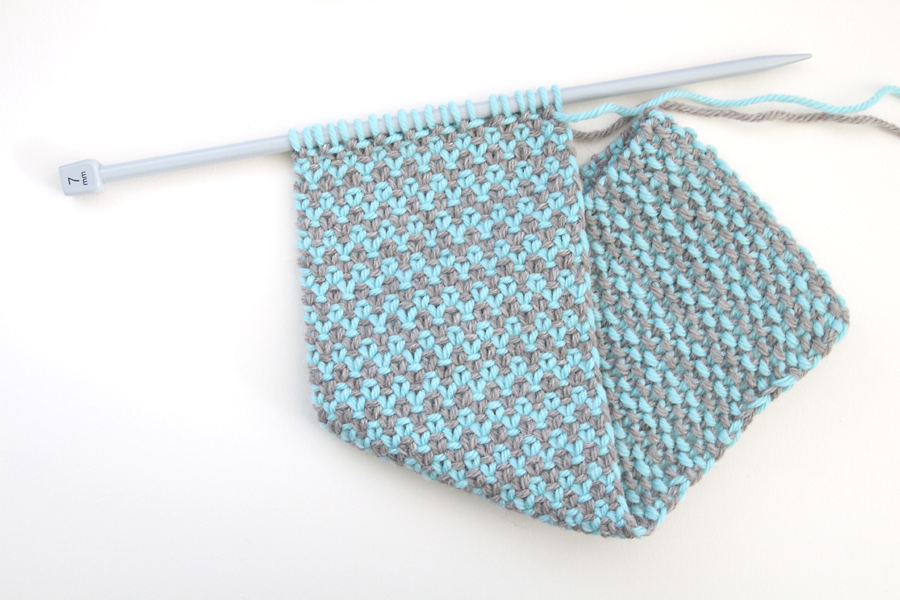
I found the weaver’s stitch in a knitting book. It creates a two-coloured woven-style flat front with a textured back that is reminiscent of a spacious garter-stitch.
The pattern is quick to learn once you figure out the stitches (more details on what the abbreviations mean are further down this post). It’s a two row pattern that is repeated with two colours.
Weaver’s stitch pattern (abbreviated version)
Yarn A, cast on an even number of stitches.
Row 1 (yarn A): *k1, s1 wyif*
Row 2 (yarn A): *p1, s1 wyib*
And then repeat with yarn B.
Weaver’s stitch pattern (detailed version)
Yarn A, cast on an even number of stitches.
Row 1 (yarn A): *knit 1, slip 1 stitch purlwise with yarn in front* (repeat these two stitches across the entire row)
Row 2 (yarn A): *purl 1, slip 1 stitch purlwise with yarn in back* (repeat these two stitches across the entire row)
Trap the old yarn under the new yarn and repeat these two rows with the new yarn.
Front of the weaver’s stitch fabric

Back of the weaver’s stitch fabric

What are “wyif” and “wyib”?
These abbreviations were confusing to me at first. I was trying to slip a stitch and then bring the yarn forward and wondering what to do next. Helpful instructions and photographs from Berroco Design Studio called Ask Amanda: What does wyif mean? came to my rescue.
In the weaver’s stitch, these instructions are paired up with the slip stitch when written as “s1 wyif” and “s1 wyib”. These mean “with yarn in front slip 1 stitch purlwise” and “with yarn in back slip 1 stitch purlwise”. You need to move the yarn to the front/back of your piece before you slip the stitch (insert the right needle in to the stitch on the left needle as if you were about to purl it and then simply move the stitch over to the right needle).
Use larger needles than recommended
My yarn ball recommended size 5-6mm knitting needles (US size: 8-10). My first swatch using 5.5mm needles (US size: 9) was very dense. I tried a second time using 7mm needles (US size: apparently there isn’t an equivalent but it’s between sizes 10 1/2 and 11) and the stitches are more visible, the fabric is pliable and it has a small amount of stretch.
Of course if you want a more solid fabric, choose the smaller needles.
Trap the yarn when you switch colours
When you change colour on the right hand side of the work, make sure that you trap the colour you just used underneath the new colour to create a neat edge.
These photographs show the steps when I’ve just completed a row in the old colour (blue) and I want to switch to the new colour (grey).
Step 1 – I’ve just completed the second row with the old colour (blue), I’ve turned the piece around getting ready to knit again, and both my yarns are on the right hand side of the piece.

Step 2 – To switch to the new (grey) yarn, lift the new (grey) yarn over the top of the old (blue) yarn.

Step 3 – Give both of the yarns a light tug to create a neat edge. Tug the new (grey) yarn upwards and the old (blue) yarn downwards, and then start knitting with the new (grey) yarn.
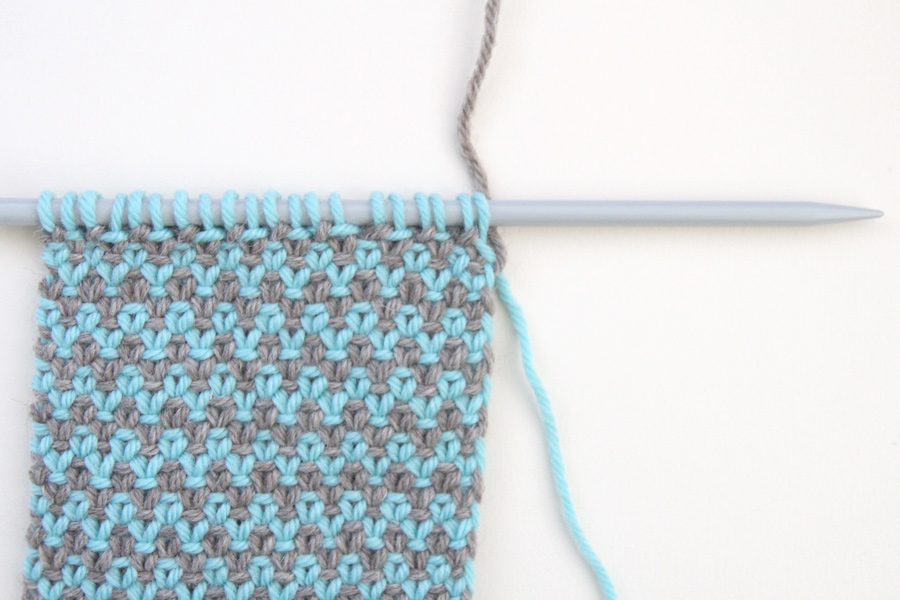
Keep the yarn balls separate
Switching colours can lead to massive tangles. Keep the two yarn balls separate (this is easier when you use center-pull balls of yarn that don’t roll around so much) and take a moment when you turn your work to check that the yarns aren’t getting tangled.
Uses for the weaver’s stitch
I think the weaver’s stitch could be useful for items like placemats, bags, and zip purses because it’s a firmer fabric than, for instance, stockinette stitch and the front is nice and flat.
Colour choice will affect how strongly the pattern pops from your piece. Once I complete this scarf I plan to try the weaver’s stitch with one solid and one self-striping yarn to see what colour effects that produces.
I hope you have fun using the weaver’s stitch! Leave me a comment if you want to share what you made.
I have ripped for 2 hours before finding your post, thanks so much.
Hi Doris,
I did some ripping too when I was tackling this one so I wrote up the details to avoid it next time I need to knit this stitch. I’m happy to hear that my notes have helped you.