 A few months ago I started crocheting again for the first time since childhood. I’ve been trying out a few crochet hats and some have worked out better than others. Here’s one of the more successful experiments.
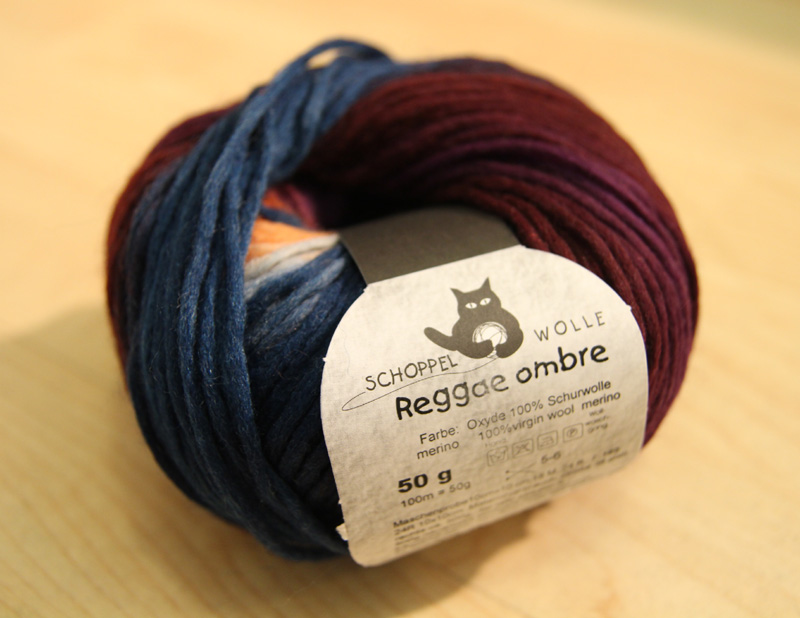
As I’ve been looking at crochet patterns, I’ve marvelled at multi-coloured yarns that have long lengths of colour with gradual changes. When I went to Morris & Sons to look at their sale items last weekend, I ended up browsing everything in the store and found Schoppel Wolle’s Reggae Ombre (100% virgin wool merino, 100m, 50g) and realised it might give me the blended stripes I was after. I bought a few balls and then had to figure out how I was going to crochet them in to a hat!
I started a few patterns but I quickly found some hurdles:
- A pattern with joined rounds would result in jagged colour jumps from one row to the next. I forgot to take a picture but, imagine that a round starts with red yarn, the yarn changes to orange by the end of the row. If you join and then start the next row the orange colour will continue above the red and it creates a kind of orange coloured step from one row to the next. By the time you finish that row the colour might be different again when you join it up. The steps might have looked okay on completion but it was not the effect I wanted.
- To avoid unravelling everything, I tried to continue by turning at the end of each round but realised that this would create a seam where the colour turns at each row, and the surface of the beanie would have the alternating rows of back and front of stitches rather than a consistent finish. The colour changes in the yarn are unpredictable so it may end up very obvious where the seam is, and then I’d have to worry about which way I put the hat on because it might look funny being worn with the seam on the side of my head.
I then found Jenn Wolfe’s Just Like That Hat pattern which gave me a simple spiral pattern that I needed to adjust to my yarn (her pattern is for a much thicker yarn so I had to make more increases and rows). With a little guidance from someone else’s experiments (Crochet in Color’s Still Trying to Customize Hat Sizes blog post) and a lot of trialing the piece on my head as it grew, I’m happy with the end result. The hat fits with a slight looseness that my other attempts have been lacking so I think I’ll be able to wear it all the way from winter to spring.
I could have completed the hat with one ball but I wanted a longer hat which threw me another problem to solve – the ball I was using ended with orange yarn, but the next ball had one dark purple and one brown yarn end. I really wanted to avoid an obvious join! I realised that I had to unravel the new ball enough to find a close match to the colour that the first ball ended with so that it would be a blended join. Luckily only a few metres of unravelling the brown end gave me a matching orange section of yarn so the yarn join is now unnoticeable and the few metres I had to sacrifice have been added to my yarn stash to use another time.
Here is how I crocheted my colourful spiral hat:


woman crochet beanie
Striped adult woman crochet beanie pattern
Yarn: 2 balls Schoppel Wolle’s Reggae Ombre (100% virgin wool merino, 100m, 50g)
1 ball would have been sufficient for a shallow adult female hat, but I wanted the hat to be longer so I used a small amount from a second ball.
Hook: 5mm (US H hook)
Crochet stitches:
hdc = American half double crochet (English term: half treble)
sc = American single crochet (English term: double crochet)
magic ring = if you’re unsure how to do a magic ring/circle, there are a lot of photo and video instructions online. Here’s a tutorial from Planet June – Magic Ring however please note that the tutorial refers to making sc’s (single crochets) in to the magic ring, whereas the following pattern requires you to do hdc’s (half double crochets) in to the magic ring for row 1. It’s the same technique, just using a different stitch.
The hat is worked top-down in a spiral so you won’t join after each round. Put a marker in place to keep track of the start of each round.
Pattern:
R1: 9 hdc in to magic ring (9 hdc)
R2: * 2 hdc in each stitch * (18 hdc)
R3: * 2 hdc in next stitch, hdc in next stitch * (27 hdc)
R4: * 2 hdc in next stitch, hdc in each of the next 2 stitches * (36 hdc)
R5: * 2 hdc in next stitch, hdc in each of the next 3 stitches * (45 hdc)
R6: * hdc in each stitch * (45 hdc)
R7: * 2 hdc in next stitch, hdc in each of the next 4 stitches * (54 hdc)
R8: * hdc in each stitch * (54 hdc)
R9: * 2 hdc in next stitch, hdc in each of the next 5 stitches * (63 hdc)
R10: * hdc in each stitch * (63 hdc)
R11: * 2 hdc in next stitch, hdc in each of the next 6 stitches * (72 hdc)
R12: * hdc in each stitch * (72 hdc)
R13: * 2 hdc in next stitch, hdc in each of the next 7 stitches * (81 hdc)
(after R13, the piece is approximately diameter of 7 3/4” and circumference of 22”)
R14+: continue to hdc in each stitch until you’ve reached the desired length
(in my hat, I continued this way for approximately 13 rows)
Final R: single crochet in each stitch, and weave in the end
(at the end, my hat measures approximately 7 1/2” radius from the centre of the hat to the edge and a circumference of 23”)